
Get more done with FoxSchema
Pick an area below, then choose any feature to see how it works and the shortcuts that save you time.
Comparison
Compare two databases, review exactly what differs, and deploy the fix. Open Compare on the left rail. Save your connections once under Creds and every area of FoxSchema can use them.
Save a database connection
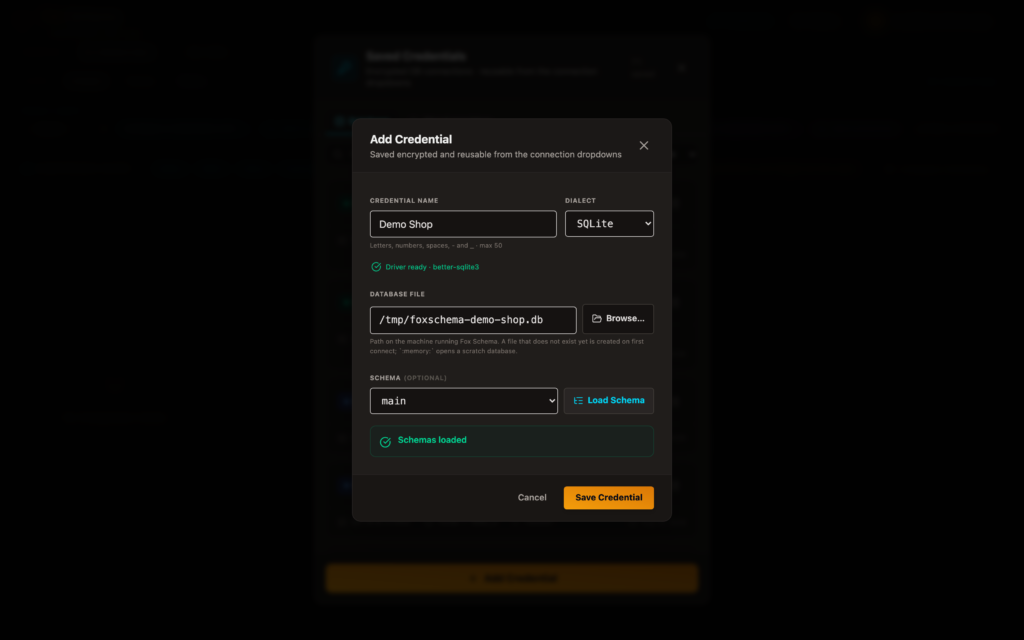
Save each database once and reuse it everywhere: Compare, the Editor and Utilities.
Open it: Creds on the left rail
How to use it
- Click Creds on the left rail.
- Pick the database type. Saved connections are grouped by type, and you can search them by name.
- Fill in host, port, database, username and password. SQLite and DuckDB use a file path instead: choose it with Browse….
- Click Load Schema to check the connection and list its schemas, then Save Credential. Passwords are encrypted and never sent back to your browser.
Compare two databases
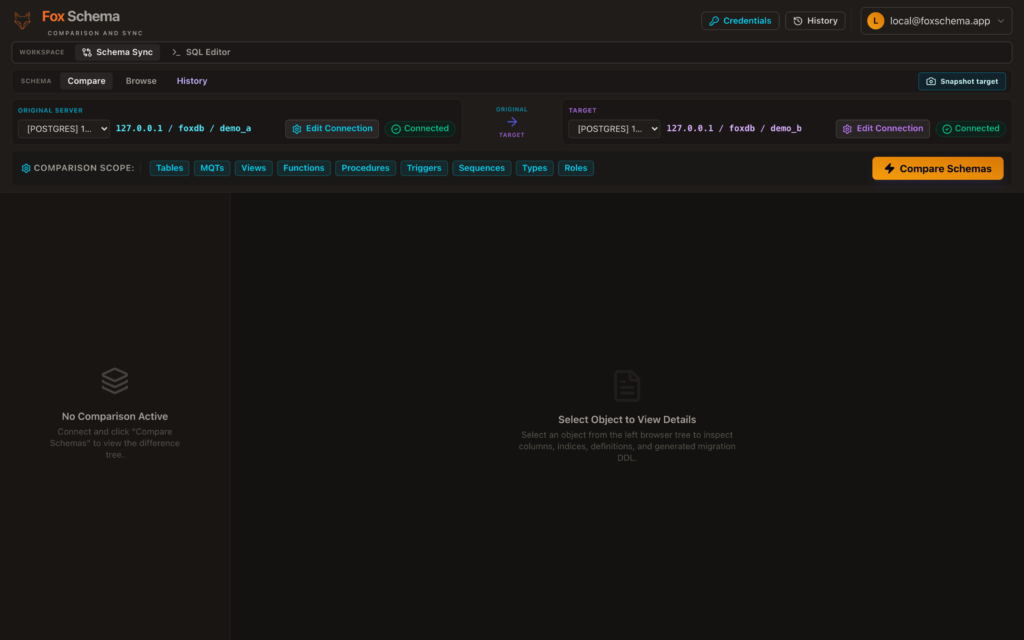
FoxSchema reads both schemas and builds one diff covering tables, columns, keys, indexes, views, functions and more.
Open it: Compare on the left rail
How to use it
- Open Compare.
- Choose an Original Server connection (where you compare from) and a Target connection (where you compare to).
- Click Compare.
- Use the scope filter to narrow what is read, for example tables only, or views and functions.
Read the diff
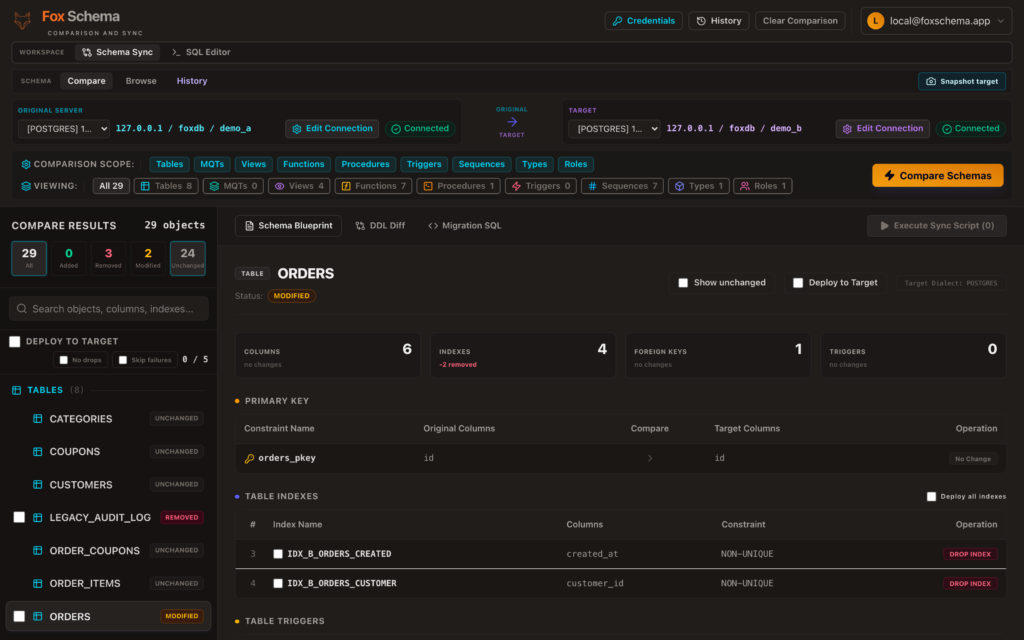
Every object is marked Added, Modified, Removed or Unchanged, so you see what a migration would do before you run anything.
How to use it
- Check the summary at the top: Added (green) exists in the Original but not the Target, Modified (yellow) differs, Removed (red) exists only in the Target, and Unchanged is identical.
- Click an object to see the exact column, index, foreign-key and trigger differences.
- Use the search box to jump straight to a name.
Generate and deploy a migration
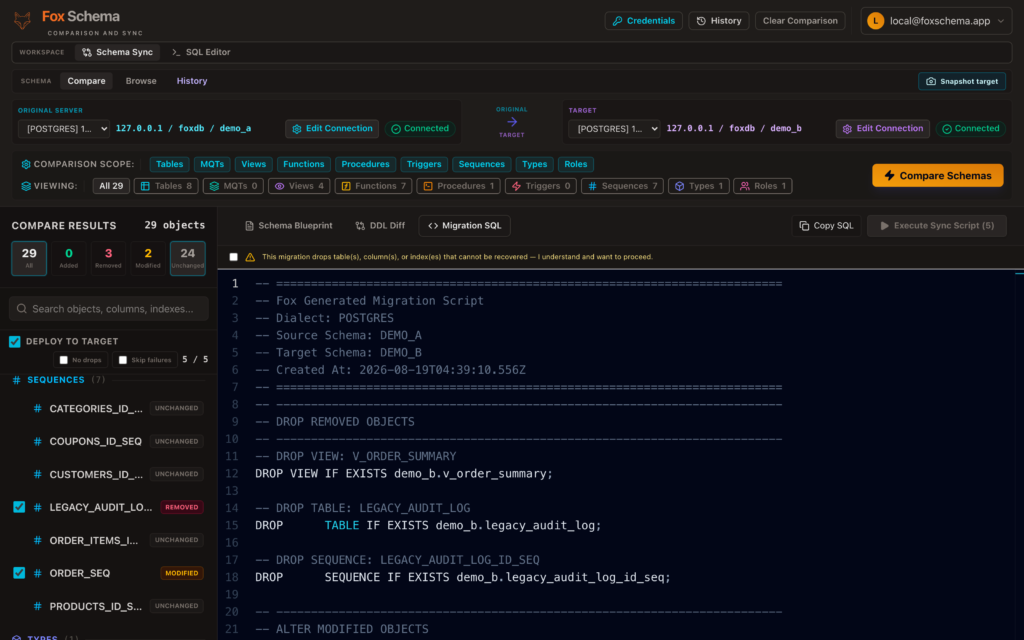
Turn the diff into SQL in the Target’s own dialect, review it, then apply it, or copy it and run it yourself.
How to use it
- From the diff, tick the objects you want under Deploy to Target (the checkbox at the top ticks them all), then open Migration SQL.
- Review the SQL. Nothing has been applied yet.
- Click Execute Sync Script. If the plan drops anything, tick the acknowledgement above the SQL first. Confirm in the dialog, and FoxSchema takes a pre-migration snapshot first.
- Optional: turn on No drops to leave every drop out of the plan, or Skip failures to continue past any single object that fails instead of rolling back the whole run. The result says “completed with failures” and lists what was skipped.
Execute safety checks
Execute refuses a plan that would leave the Target inconsistent or that you have not acknowledged, so a risky deploy cannot happen by accident.
What it checks
- A foreign key that would point at a table missing from the Target, or a type change that narrows (for example
varchar(100)tovarchar(20)): Execute opens a review instead of deploying. Include the missing table, drop the foreign key, or acknowledge the narrowing. - A drop that would break a dependent object, a destructive drop, or a MySQL
CREATE FUNCTIONwhere the binary-log privilege is a risk: Execute stays disabled until you resolve or acknowledge it. - Execute is also disabled when your role cannot migrate, nothing is selected, the Target is disconnected, or a required Git commit is missing.
Commit a migration to Git
Keep a reviewable, replayable record: commit the migration as a plain SQL file, then run it from that exact commit.
Available once an admin has added a Git repository under Access control → Git
How to use it
- In the migration view, choose Commit to Git next to Execute.
- Choose the repository and a branch, or New branch…, which starts from the repository’s default branch.
- Write a note. It becomes the commit message, so say what the migration does and why.
- Review the file FoxSchema will add (for example
migrations/20261002-153012__your-note.sql). It is plain SQL anyone can read and run, and passwords in account statements are replaced with<password>. - Click Commit, or Commit & push to send it to the remote for review. Execute then reads “Execute committed” and runs from that commit.
Editor
Run SQL on one or many servers, edit data safely, and script repetitive work. Open Editor on the left rail, next to Compare.
Run SQL on one or many servers
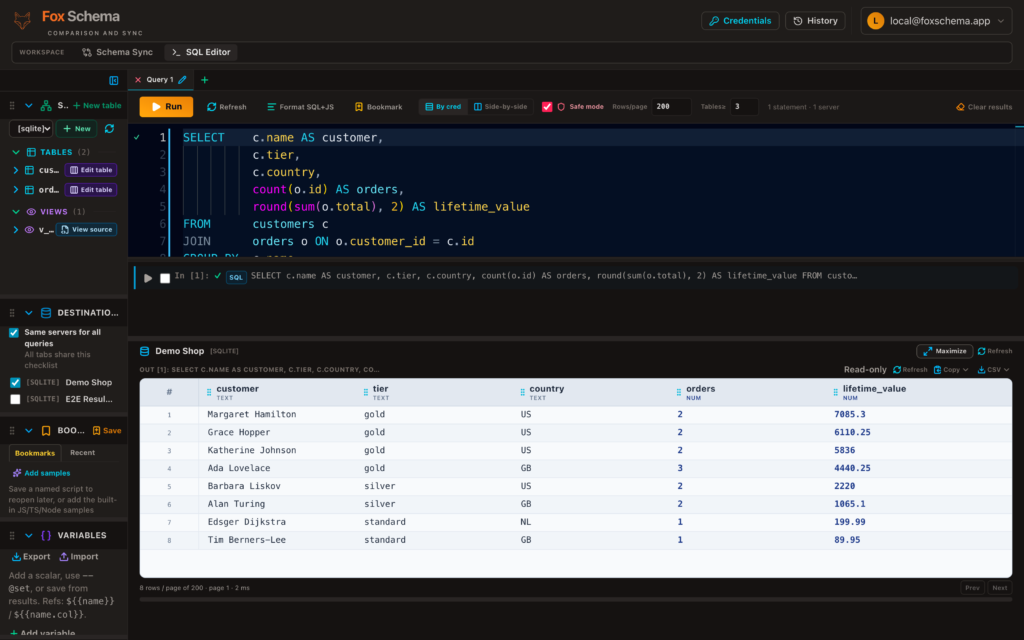
Check several Destinations and the same SQL runs against every one, which is handy for comparing environments.
Open it: Editor on the left rail
How to use it
- Open Editor.
- Under Destinations, check one or more saved connections.
- Type SQL. Several statements are fine, but Run executes only the statement your cursor is in.
- Click Run. Results appear below, grouped by connection, stacked or side by side.
- Select any SQL and Run becomes Run selection: only that text executes.
Schema explorer and autocomplete
Browse objects without leaving the editor, and get completions from the live schema.
How to use it
- Browse tables and other objects in the explorer on the left. Click a name to insert it at the cursor.
- Type a schema name and a dot (for example
demo_a.) to list that schema’s tables.table.andalias.suggest columns. - In
FROMandJOIN, the inserted name comes with an alias so you can qualify columns with the short name. - Open Edit table to see each index and its fragmentation.
Data Peek and row editing
See a table’s rows without writing a query, follow foreign keys, and add, edit or clone a row from a form.
How to use it
- Hold Cmd (macOS) or Ctrl (Windows and Linux) and click a table, view or MQT in the explorer.
- In results, foreign-key cells are underlined. Click one to open the related parent rows. Panels stack as you follow more links, and Esc closes.
- Edit WHERE, ORDER BY and LIMIT. Filters apply when you edit, leave the field, or press Enter.
- With the right permissions, use Add, Edit or Clone row. The sparkles button generates realistic sample values, and Preview shows the SQL (and a diff for edits) before you Save.
=100*1.1. Without the matching data permission, peek stays read-only.Compare data across servers
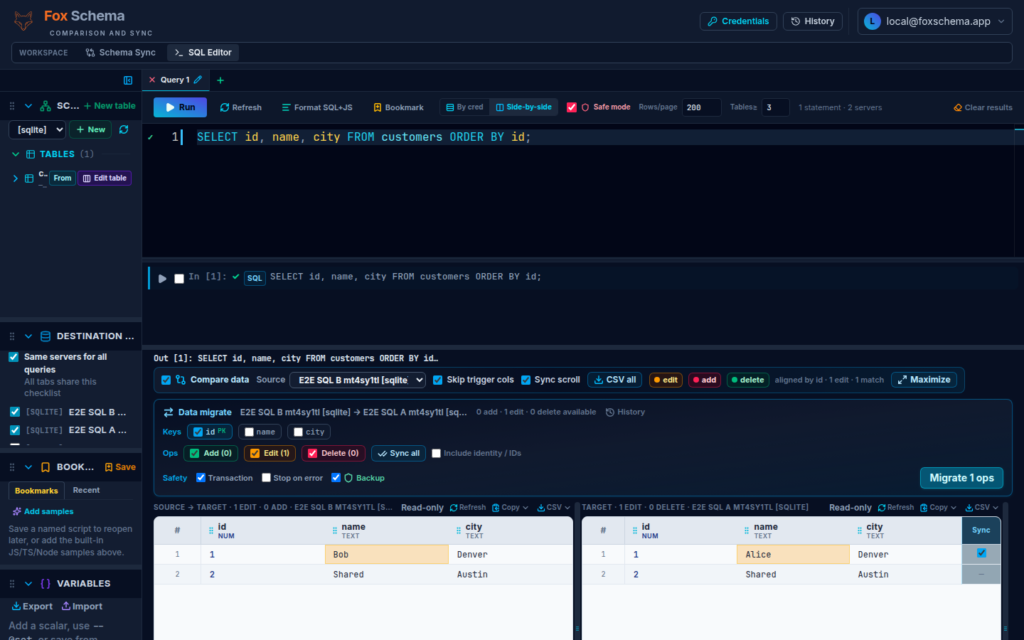
Line up the same query from two or more servers by key and see exactly which rows differ.
How to use it
- Switch the results layout to Side-by-side and check two or more Destinations.
- Turn on Compare data. It is off by default so grids stay plain.
- Rows line up by key columns (primary keys, or the Keys you check), so matching IDs share a row.
- Read the colors: amber is modified, rose is only in the original, emerald is extra or only in the destination.
- Click Compare 2,000 rows to re-read both sides in key order. Every row in that window is classified, and you can filter by All, Changed, Only in source, Only in target, Unresolved or Matching.
createdAt and updatedBy do not show up as differences.Data migrate
Apply the differences you found, adding, editing or deleting rows on the destination, with a safety net and a record of what changed.
How to use it
- With Compare data on, Data migrate appears below it.
- Add, Edit and Delete are all ticked by default. Untick any you do not want: Delete removes rows from the destination.
- Use the Sync column to include or exclude individual rows. Sync all re-checks every differing row.
- Pick your safety options: Transaction (all-or-nothing when Stop is on), and Stop on error or Continue on error.
- Click Apply. With Safe mode on, confirm the prompt (for example “Apply 4 ops”). Progress lists each row, FoxSchema snapshots the affected destination rows, and the run is recorded under Data migrate history.
Variables and secrets
Capture a value once and reuse it in later statements, even per server.
How to use it
- Put
-- @set nameimmediately above the SELECT whose result you want, then use${{name}}in later statements. - For a column, write
-- @set ids = column idand use${{ids}}. For a table, write-- @set t = tableand use${{t.id}}. - You can also add variables in the Variables sidebar, or right-click a result cell, column header or empty grid.
- Mark a variable secret to mask it. Secret values live only for the session, so re-enter them after a reload.
-- @set orderid
SELECT MAX(id) FROM orders;

SELECT * FROM order_items WHERE order_id = ${{orderid}};${{ autocompletes names. Hover a reference to see its value, and use Per connection… to override a value for one destination.Code cells (JavaScript and Node)
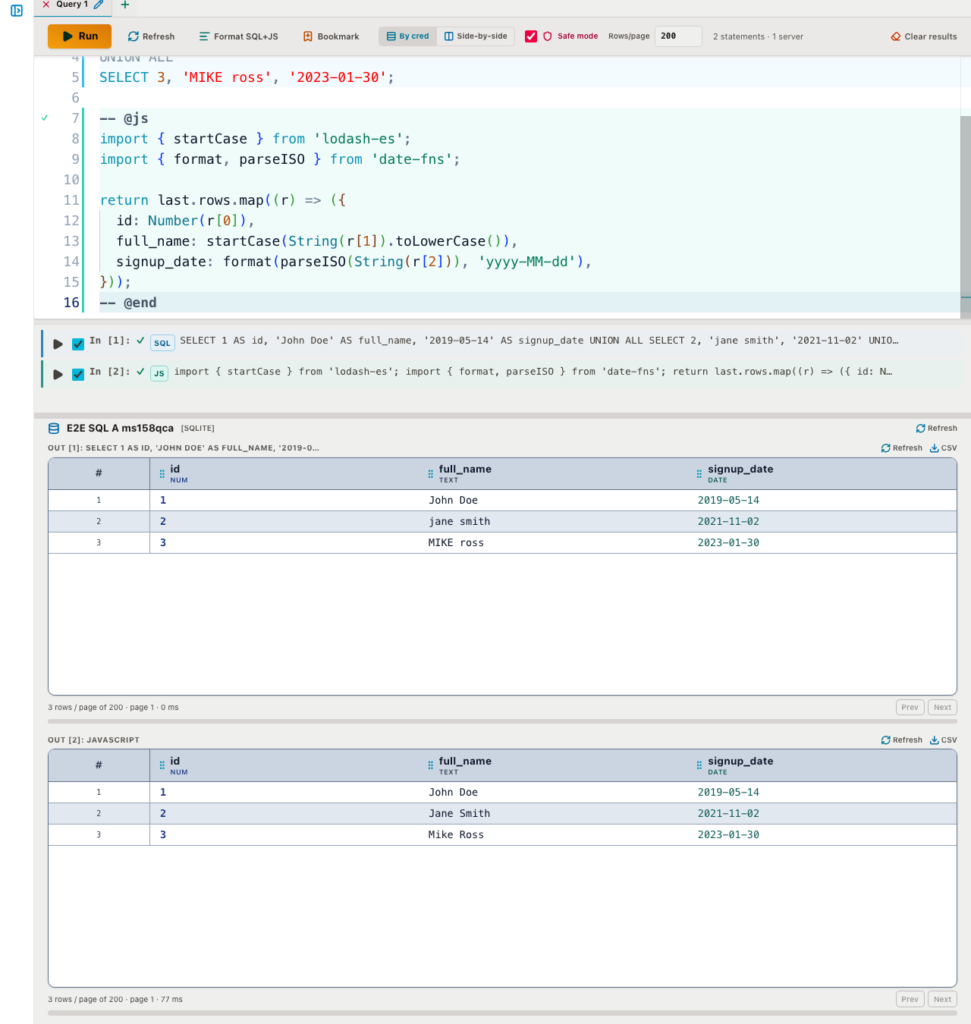
Mix SQL with a little JavaScript to transform results, call an API or generate test data, all in the same buffer.
How to use it
- Fence a cell with
-- @js…-- @end(runs in your browser) or-- @node…-- @end(runs on the FoxSchema server). TypeScript versions are@tsand@nodets. - The cell receives
last(the previous statement’s grid) andvars(your variables). You mustreturneither{ columns, rows }or an array of plain objects. Tick the cell and the statement before it on the run rail so they run together; otherwiselastis empty. - Import
lodash,date-fnsor@faker-js/fakerat the top of the cell. - In Node cells, run SQL with the
sqltagged template. Values become bind parameters, so they never turn into SQL text.
SELECT id, email FROM user;

-- @js
import _ from 'lodash';
return _.map(last.rows, (r) => ({ id: r[0], doubled: Number(r[0]) * 2 }));
-- @endvars.apiToken. Node cells run on the FoxSchema server, so if you host FoxSchema for other people, only allow them for people you trust.Tabs, bookmarks and results
Keep your work organised and your results manageable.
How to use it
- Open several tabs and rename one with a double-click. Your SQL text is remembered locally; result grids are not.
- Save reusable snippets as Bookmarks from the sidebar.
- Click Format to pretty-print the buffer, and Clear to remove the active tab’s results.
- Set Rows/page (200 by default) and use Next and Prev. Visited pages stay cached, so going back does not query the server again.
Safe mode and One transaction
Guard rails for running writes: confirm risky statements, and make a batch all-or-nothing.
How to use it
- Safe mode: when on,
UPDATE,DELETE,MERGE, upserts that can overwrite rows, and DDL need an extra confirmation. A plainINSERTdoes not. - On the run rail, a statement’s number turns amber for a write Run will ask you to confirm, and red with ! for an UPDATE or DELETE with no WHERE.
- One transaction: when on, every statement in that Run is one transaction per destination. A failure rolls the batch back and later statements do not run.
- Engines that auto-commit DDL (MySQL, MariaDB, TiDB, Oracle, CockroachDB) cannot undo DDL that already ran. Redis, MongoDB and ClickHouse cannot roll back at all, so a multi-statement Run with One transaction is refused there.
Utilities
Everyday database upkeep and insight, one connection at a time. Open Utils on the left rail, pick a saved connection at the top, then choose a tool.
Index Management
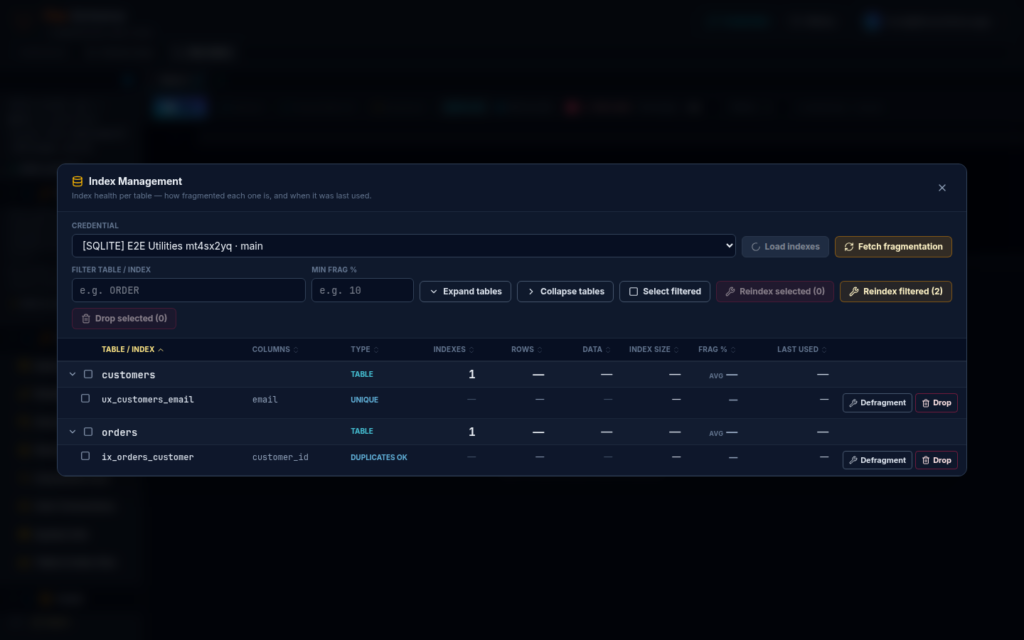
See which indexes are fragmented and clean them up in batches.
Open it: Utils → Index Management
How to use it
- Pick a connection and click Load indexes. Indexes are grouped by table.
- Filter by name or by a minimum fragmentation %.
- Click Fetch fragmentation to measure many indexes in one batch.
- Defragment selected indexes, or all the filtered rows.
Clone Table
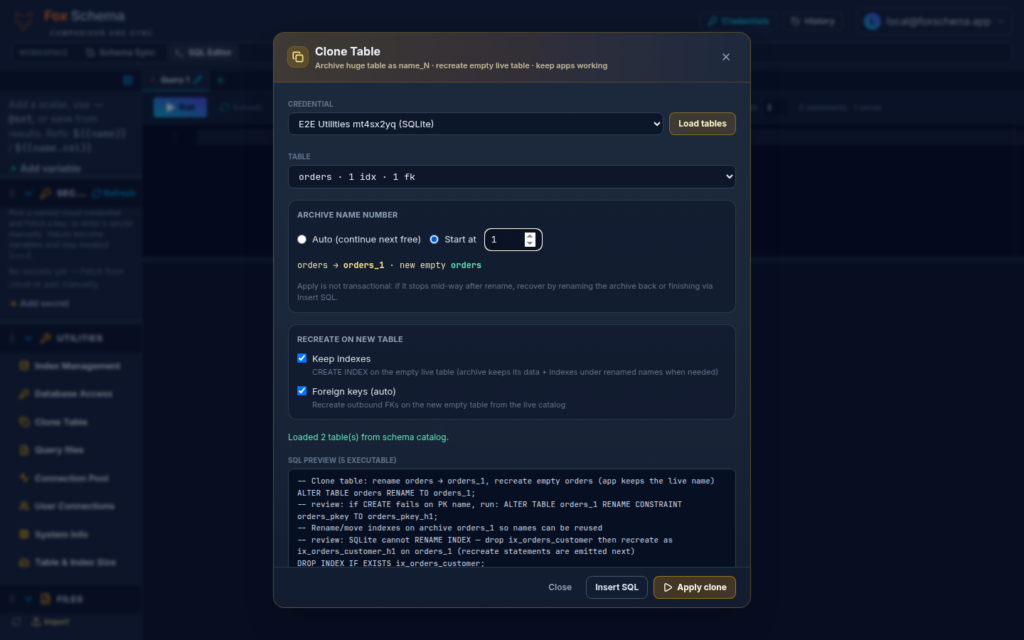
Archive a huge table and recreate an empty one with the same name and columns, so applications keep working.
Open it: Utils → Clone Table
How to use it
- Click Load tables and pick the table. The archive is named
name_1, the next freename_N, or a number you choose. - Toggle Keep indexes and Foreign keys (auto) for the new table.
- Review the SQL preview, then Insert SQL into the Editor or click Apply clone.
Rename Column
Rename a column, change its type, or both, the safe way, with the impact shown first.
Open it: Utils → Rename Column
How to use it
- Pick a table and column, then a new name and/or type. Types already used on this connection are suggested.
- Review what it touches: indexes, unique constraints, outbound foreign keys, triggers, functions, procedures, and views that may mention the column (a text match).
- A rename alone is one instant statement. A type change runs in three parts: add a nullable column, copy rows in batches with progress, then move constraints, triggers and the description and drop the old column.
- Copy or Run each part, or choose Execute all. Open in editor sends the whole script to a new tab.
Backup and Restore
FoxSchema writes the backup and restore commands for your connection and tells you where they run.
Open it: Utils → Backup & Restore
How to use it
- Pick a connection. The amber banner says where the command runs: on your machine, on the database server, or in the cloud.
- Choose folder, format, scope and compression.
- Copy the shell command, or use Open in SQL Editor for SQL-based backups.
- For SQL Server, CockroachDB, ClickHouse and DuckDB, Run backup now runs it after a confirmation that names the file and connection. List backups on this server shows existing ones, newest first.
Server insights
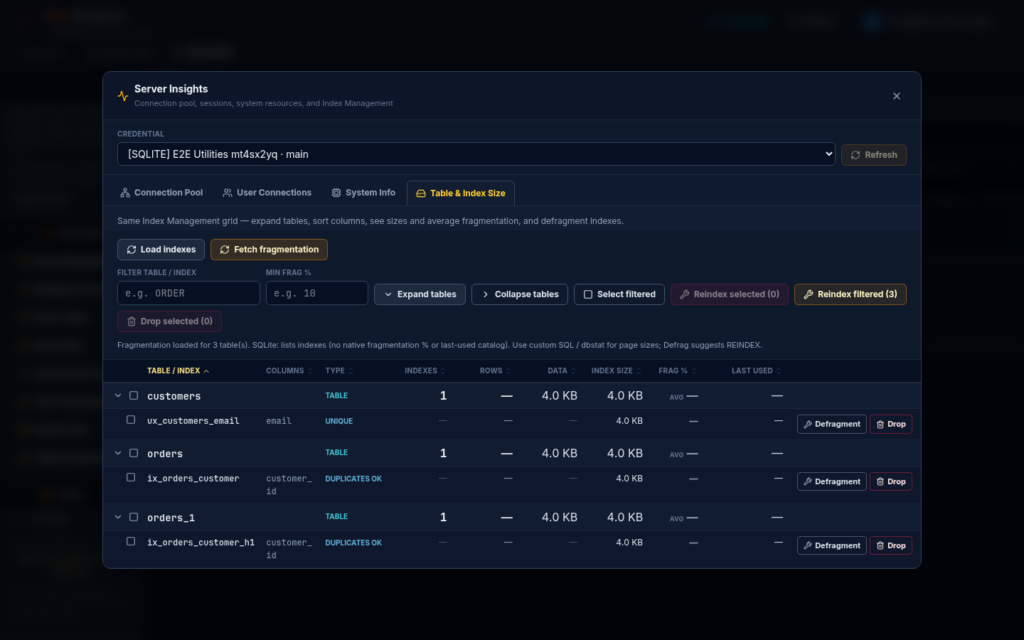
Quick health checks: Connection Pool, User Connections, System Info, and Table and Index Size.
Open it: Utils → Insights
How to use it
- Pick a connection and choose a tool under Insights.
- Read the figures. They are estimated where the engine has no physical measure.
- Click Refresh to update them.
SQL Tracer
Watch the statements hitting a connection, as they run.
Open it: Utils → SQL Tracer
How to use it
- Pick a connection and open SQL Tracer. It needs the SQL Tracer permission (Owner and Admin by default) because a trace shows other people’s SQL.
- Choose Fox activity (every statement run from FoxSchema on this saved connection, with time, rows and any error; works on every engine) or Live (the engine’s own session list, read about once a second; not on SQLite or DuckDB).
- Click a row for the full text and Open in editor.
- Press Stop when you are done.
Query files
Query a CSV, JSON or fixed-width file with SQL, or load it into a database table.
Open it: Utils → Query files
How to use it
- Open Query files and add a file: CSV or TSV (comma, tab, semicolon, pipe or custom delimiter), JSON (an array or NDJSON), or fixed-width text.
- Pick a destination: a new temporary SQLite workspace (the default; add more files later so several tables share it) or Import into saved credential.
- Click Import & open: FoxSchema opens the Editor on the new file with a ready-made SELECT.
DB users and grants
Look up database users and what they can do, from the same catalog as the Access workspace.
Open it: Utils → DB users & grants
How to use it
- Pick a connection and open DB users & grants.
- Browse the users, roles and their privileges.
- Changes (
GRANTandREVOKE) need the Grant privileges permission.
History
See how a database changed over time, roll it back or forward, and review every migration you have run. Snapshots and Applies are on the left rail.
Take and browse snapshots
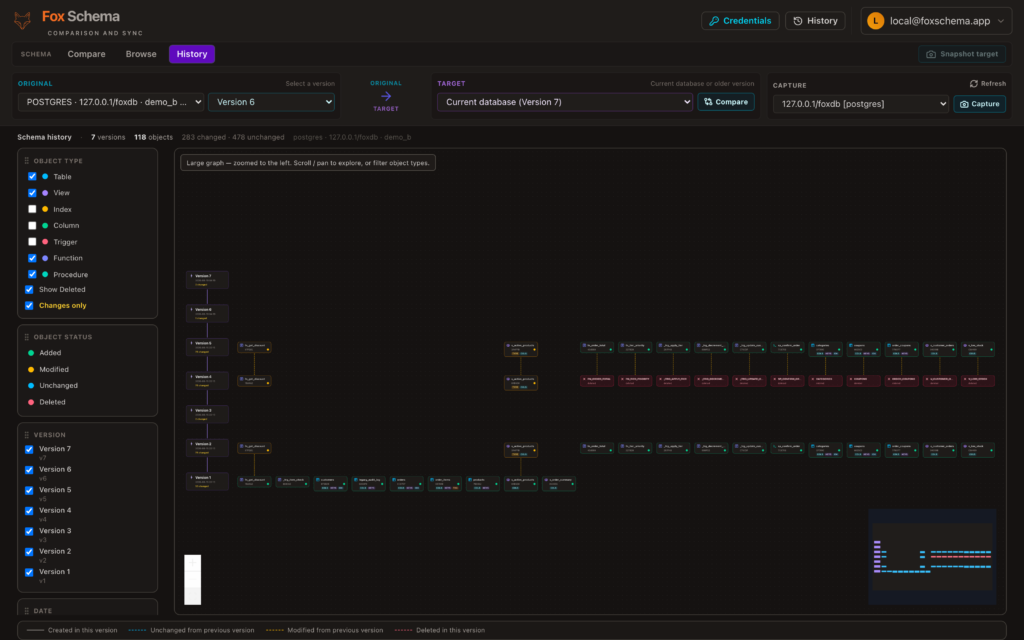
Track versions of one database over time, and see what changed between them.
Open it: Snapshots on the left rail
How to use it
- Pick a saved connection and click Capture (a brand-new history offers Take first snapshot instead). Snapshot again after a live change. Applying a Compare migration also records a version.
- The version graph stays on screen while it reloads. Use Graph to hide it.
- Original and Target work like Compare: Original is a version, and Target is the live database or another version.
- Click Compare to compare the two versions. It is a preview: nothing is written to the live database until you press Revert or Update.
Revert or update to a version
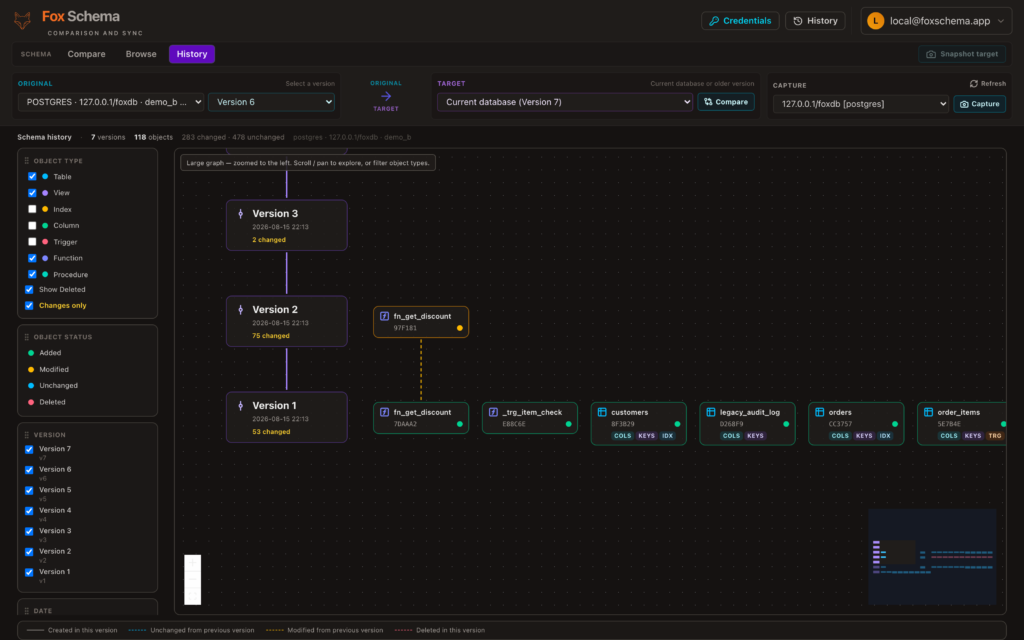
Roll a live database back to an earlier version, or bring it forward, with a plan you review first.
How to use it
- Pick the versions to compare, then tick the objects to change (or Select all). Nothing ticked means nothing runs.
- Review the plan. A plan that would destroy data needs an extra confirmation, and a blocked plan is refused.
- Click Revert, which rolls back, or Update, which appears when the plan only adds because the database has fallen behind.
- FoxSchema snapshots first, then appends a new version. It never rewrites the version you picked.
Force migrate to another database
Apply a stored version to a different database.
How to use it
- Click Force migrate… and pick its own version and target. These are separate from whatever the graph is showing.
- Confirm “this is not the history’s database”.
- If the plan destroys data, confirm that separately. Agreeing to data loss is not agreeing to target another database.
Migration history (Applies)
Every Schema Compare migration you apply is recorded, with its status, target, exact script, pre-migration snapshot and per-object results.
Open it: Applies at the bottom of the left rail
How to use it
- Open Applies and pick a run.
- Read its status, target and the exact script that ran.
- Review per-object results, including any failures that were skipped.
Migrations from your team (Git)
See which committed migrations have run against the database you are connected to, and run the ones that have not.
How to use it
- In Applies, open Git and pick a repository’s branch.
- Fetch gets the remote’s branches and shows how far behind or ahead you are. Pull brings the branch up to date. If the same file changed on both sides, FoxSchema stops and changes nothing.
- Each migration is marked Applied, or Incoming when it has not run on this target yet. Review shows the file.
- Click Run on an incoming migration to apply it from its commit, with the same confirmation and progress as Execute. Push sends your own commits; if the remote moved on, pull first.
Need something that is not here?
Tell us what you would like built, from a new feature to a custom n8n node.
